How to Place Downlights in a Living Room?

Time:2026-10-17 Author:Sienna
0%

Planning downlights for a living room requires more than placing lights in an even grid. The right layout should support reading, conversation, television viewing, and movement without creating harsh glare. Before drilling, examine the room’s ceiling height, furniture arrangement, wall colors, and natural daylight. These details often matter more than room size alone.

A common question is, “Where to place downlights in a living room?” In practice, position them according to activities and visual focus. Lights near seating can illuminate books or faces, while wall-washing downlights can highlight artwork, shelving, or textured surfaces. Avoid placing a strong beam directly above a television, because reflections may make the screen uncomfortable to watch. Keep fittings away from tall cabinets and door swings. Leave practical space around ceiling fans, smoke alarms, and air-conditioning vents.

There is no perfect spacing rule for every home. A lighting designer may begin with the manufacturer’s beam angle and recommended spacing, then adjust for the actual ceiling height. A qualified electrician should verify wiring, load capacity, dimmer compatibility, and local safety requirements. This step is not optional. Test one or two temporary positions at night before committing to the full installation. You may discover that a technically balanced grid feels cold or shadowy. That is useful evidence, not failure. Good lighting should feel natural, remain flexible, and serve the room’s daily habits rather than simply fill the ceiling with bright spots.
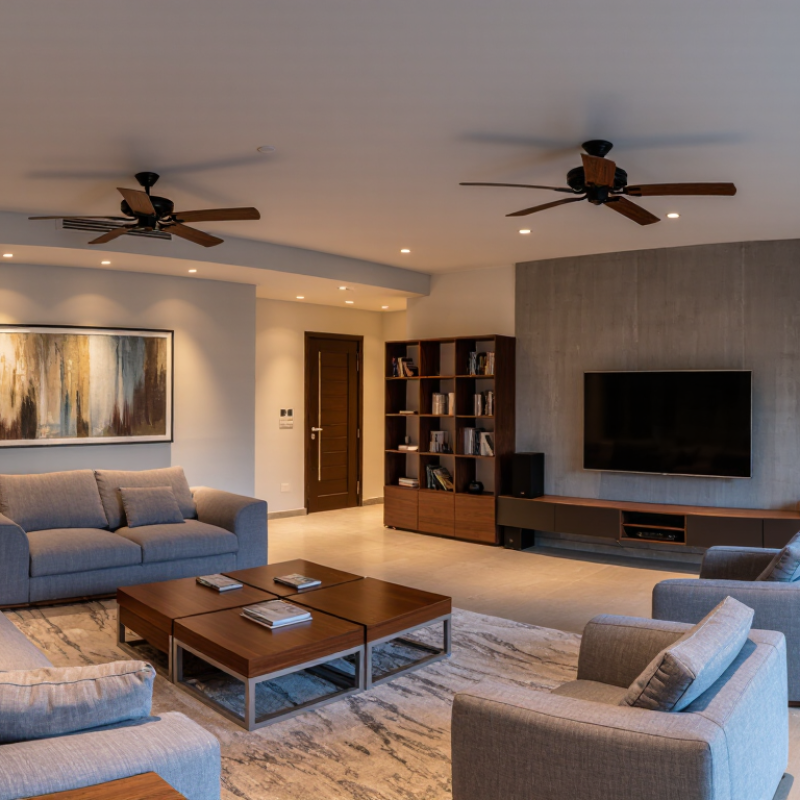
How to Place Downlights in a Living Room?

Assess the Living Room’s Size, Shape, and Lighting Needs

Before placing downlights, measure the living room’s length, width, and ceiling height. A compact room may need fewer fixtures than expected. Too many lights can make the ceiling look crowded. In a larger room, divide the space into clear lighting zones. Keep fixtures away from walls unless you want to highlight artwork or textured surfaces. A scaled floor plan helps reveal awkward gaps. It prevents guesswork.

The room’s shape also affects the layout. A long, rectangular living room often benefits from two lighting rows. Avoid a single central line that leaves the sofa edges dim. Square rooms usually suit a balanced grid, but furniture can change the best positions. Irregular rooms need flexible spacing around corners and recesses. My first sketch was too tidy. Real furniture rarely follows perfect geometry. A sofa, coffee table, and cabinet should guide the placement.

Consider how the room is used at night. General illumination supports conversation and movement. A reading chair needs stronger, focused light nearby. Artwork may need separate accent lighting, while a television wall usually benefits from softer brightness. Keep downlights away from the screen to reduce reflections. Windows also matter. Daylight can make one side of the room appear brighter than the other. Dimming allows better control during cloudy afternoons and quiet evenings. The exact spacing still depends on beam angle, ceiling height, and surface color. Some shadows are useful.

This estimate uses a 150 lux ambient-light target for a living room, an 800-lumen downlight, a 70% utilization factor, and an 80% light-loss factor. The number of fixtures is rounded up and should be adjusted for room shape, furniture layout, wall colors, task lighting, and the beam angle of the selected downlights.

Plan Downlight Zones for Seating, Pathways, and Features

How to Place Downlights in a Living Room?

Plan Downlight Zones for Seating, Pathways, and Features

Treat the living room as several lighting zones, not one bright grid. Place downlights around seating areas to support reading, conversation, and relaxed evenings. Keep fixtures slightly in front of chairs, rather than directly above heads. This reduces harsh shadows on faces. Aim for even light across the coffee table, but avoid placing a fixture where it creates glare on a television screen. Keep it calm.

Pathways need a different rhythm. A short line of downlights can guide movement between the sofa, doorway, and adjoining rooms. Leave enough clearance from walls and furniture edges for comfortable circulation. In many rooms, spacing fixtures about one to two metres apart works as a starting point. Ceiling height, beam angle, and surface colour can change that result. Use a dimmer.

Feature zones deserve more precision. Direct adjustable downlights toward artwork, shelving, textured walls, or a fireplace surround. Light the object from an angle, not straight down, to reveal depth. I once placed a feature light too close to a painting, and the frame cast an obvious shadow. The drawing looked tidy, but the room felt uneven. Mock up the positions with temporary lamps or marked ceiling points before installation. A qualified electrician should confirm wiring, heat clearance, switching, and local requirements. Do not assume symmetry always improves comfort. A slightly irregular plan may suit the furniture better.

Choose Downlight Spacing, Beam Angles, and Light Levels

Downlight placement should follow the room’s use, not a rigid ceiling grid. Measure the room and mark furniture positions before cutting openings. For general lighting, space downlights about 1.2 to 1.8 metres apart. Keep the first row around 0.6 to 0.9 metres from the walls. This reduces scalloped shadows and keeps light away from curtains. A sofa or coffee table may need different spacing. That is normal.

Beam angle controls how widely each light spreads. Choose a 36 to 60-degree beam for balanced living-room coverage. A narrower beam can highlight artwork, shelving, or a reading chair. Wider beams suit low ceilings and open seating areas. Avoid aiming lights directly at the television. Reflections quickly become tiring. Test one fitting first. Ceiling height, trim depth, and wall colour can change the result more than expected.

Light levels should support calm evenings and practical activities. Around 100 to 200 lux often suits general living-room illumination. A reading corner may need roughly 300 lux at the chair. Use dimming so the room can shift from bright cleaning light to softer evening light. I once planned an evenly spaced layout that looked professional on paper but felt flat in use. Moving two downlights toward the seating area improved comfort. The layout was less symmetrical, but more useful. Check glare from seated eye level before final installation.

Mark Ceiling Positions and Check for Obstructions

Before cutting the ceiling, draw the living room to scale. Mark furniture edges, walking paths, and the center of the seating area. Place downlight points where light will serve people, not empty ceiling space. A practical starting point is 600–900 mm from walls, then adjust for shelving, curtains, and tall cabinets. Keep spacing consistent, but do not force a perfect grid. Furniture changes.

Use a stud finder, inspection hole, or ceiling access to check every marked position. Look for joists, pipes, ductwork, insulation, and existing cables. A small pencil cross is easier to move than a misplaced hole. Recessed fittings also need clearance from insulation and framing, according to their installation instructions and local electrical requirements. An experienced electrician should verify the circuit and fire-safety details before installation.

Light output matters as much as spacing. The U.S. Department of Energy reports that LED lighting uses at least 75% less energy and can last up to 25 times longer than incandescent lighting. The Illuminating Engineering Society also treats glare control, beam spread, and visual comfort as core lighting-design concerns. Do not choose only by wattage. Check lumens, beam angle, color temperature, and dimming compatibility. I often underestimate wall reflections on the first sketch. White walls can brighten the room, while dark finishes may need closer or additional lighting. The plan may need revision.

Install, Aim, and Test the Downlights for Balanced Illumination

How to Place Downlights in a Living Room?

Install each downlight after marking furniture, walking routes, and ceiling joists. Keep fittings evenly spaced, but avoid placing them directly above the sofa. A practical layout usually follows the room’s zones rather than a rigid grid. Check the ceiling structure before cutting. Electrical work should follow local codes and be completed by a qualified electrician. The first layout is rarely perfect.

Aim the lights toward reading chairs, artwork, or circulation areas. Avoid pointing every beam toward the center, because this can create a bright patch and dark edges. Use adjustable fittings where wall washing is needed. After installation, test the lights at night with curtains closed. Sit in the room and inspect glare from normal eye level. Moveable furniture may reveal problems that an empty room hides. A small adjustment can improve comfort significantly.

Tips: Leave space between downlights and tall cabinets to prevent harsh shadows. Test one circuit at a time. Check reflections on television screens and glossy tables. If the room feels flat, the spacing may be too uniform. If it feels severe, the beam angles may need softening. Take notes during testing, since memory becomes unreliable after several changes.

How to Place Downlights in a Living Room? - Install, Aim, and Test the Downlights for Balanced Illumination

Planning Area Recommended Starting Point Typical Measurement Aiming Guidance Purpose
General room coverage Arrange fixtures in a regular grid, then adjust the layout for furniture and architectural features. Approximately 1.2–1.8 m between downlights for a typical 2.4–2.7 m ceiling. Use overlapping pools of light rather than isolated bright spots. Creates consistent ambient illumination across the main circulation area.
Wall setback Keep the first row away from the wall to reduce scalloped shadows and excessive ceiling brightness. Usually 0.6–0.9 m from the wall, depending on ceiling height and beam angle. For wall washing, aim adjustable fixtures toward the wall surface. Provides more even wall brightness and helps prevent harsh shadow bands.
Sofa and seating zone Avoid placing a fixed downlight directly above a seated person's head when possible. Place fixtures about 0.5–0.8 m in front of the seating line. Aim light toward the floor or nearby task surface rather than directly into occupants' eyes. Improves visual comfort and reduces glare while preserving useful light.
Coffee table or activity area Use one or more fixtures to support reading, games, conversation, or other activities. Position the light source approximately 0.8–1.2 m from the center of the activity surface. Aim toward the tabletop while keeping the beam outside the normal line of sight. Adds functional light without making the entire room excessively bright.
Artwork and feature wall Use adjustable downlights when highlighting pictures, textured walls, or display objects. Start about 0.5–0.8 m from the wall and refine after installation. Aim at the center or upper third of the feature, avoiding reflections on glass. Creates visual focus and adds layered illumination to the room.
Beam angle selection Select the beam angle according to ceiling height, fixture spacing, and the required level of focus. Approximately 24–40° for accent lighting; about 40–60° for broader ambient coverage. Use a wider beam when fixtures are farther apart or the ceiling is lower. Balances coverage, shadow control, and visual emphasis.
Brightness planning Calculate total light output from the room area, surface reflectance, and intended use. A comfortable living-room starting range is approximately 100–200 lux for general lighting. Use dimming to reduce output for evening use and increase it for cleaning or activities. Supports flexible lighting levels and helps limit glare and energy use.
Color temperature Choose one consistent color temperature for the main downlight group. Approximately 2700–3000 K is commonly used for a warm, residential atmosphere. Check the light beside flooring, wall paint, upholstery, and daylight before finalizing. Maintains a cohesive appearance and comfortable evening ambience.
Installation alignment Mark the layout on the ceiling before cutting openings. Check centerlines, spacing, joists, ducts, insulation, and electrical clearances. Keep rows visually aligned with walls, windows, and major furniture axes. Prevents costly repositioning and produces a cleaner finished ceiling.
Testing and adjustment Test the lights after installation during both daylight and evening conditions. Inspect from standing and seated viewpoints at approximately 1–3 m from the fixtures. Rotate adjustable fittings and dim the circuit until hotspots, glare, and dark patches are reduced. Confirms balanced illumination under real viewing conditions.

Measurements are practical starting guidelines for a typical living room. Final placement should be checked against the actual ceiling height, room dimensions, furniture arrangement, light output, beam angle, local electrical regulations, and the manufacturer's installation requirements.

FAQS

How should a living room be divided for downlight planning?

Treat the room as separate zones for seating, pathways, and features. Each zone needs a different lighting purpose. Avoid one bright ceiling grid.

Where should downlights go near sofas and chairs?

Place fixtures slightly in front of chairs, not directly above heads. This reduces harsh shadows on faces. Keep reading areas comfortable.

How can downlights improve movement through the room?

Use a short line of fixtures between seating, doorways, and nearby rooms. Start with roughly one to two metres between lights. Adjust for ceiling height and beam angle.

How far should downlights sit from walls?

Begin around 600–900 millimetres from walls. Adjust for curtains, shelves, and tall cabinets. Do not force perfect symmetry.

What should be checked before cutting the ceiling?

Mark furniture edges, walkways, and seating centres first. Then check for joists, pipes, ducts, insulation, and cables. A pencil mark is easier to move than a ceiling hole.

How should artwork, shelves, or textured walls be illuminated?

Aim adjustable downlights toward the feature from an angle. Angled light reveals depth better than direct overhead light. Test temporary positions first.

How can glare and harsh reflections be reduced?

Avoid placing lights where beams reflect onto television screens or glossy tables. Leave space near tall cabinets. Use dimmers and inspect reflections from normal eye level.

What should be tested after installation?

Test each circuit separately at night, with curtains closed. Sit in the usual seating position and check glare, shadows, and dark edges. The first layout may be wrong.

What technical details matter when choosing downlights?

Check lumens, beam angle, colour temperature, and dimming compatibility. Wattage alone does not describe useful light. Dark finishes may need closer spacing.

When should an electrician review the plan?

A qualified electrician should confirm wiring, heat clearance, circuit safety, and local requirements. Do not assume the marked positions are safe. Recheck before installation.

Conclusion

Planning downlights in a living room begins with understanding the room’s size, shape, ceiling height, furniture arrangement, and everyday lighting needs. The key question, “Where to place downlights in a living room,” should be answered by dividing the space into practical zones, such as seating areas, walkways, reading corners, and decorative features. This creates a lighting plan that supports both comfort and function instead of relying on a uniform grid.

Next, choose suitable spacing, beam angles, and brightness levels for each zone. Mark the proposed ceiling positions carefully, checking for joists, pipes, wiring, insulation, and other obstructions before installation. Once the downlights are fitted, aim adjustable fixtures toward important areas and test the lighting at different times of day. Small adjustments can reduce glare, improve balance, and create a warm, evenly illuminated living room.

Sienna

Sienna

Sienna is a skilled marketing professional with a deep expertise in our company’s core products and services. With a passion for innovation and detail, she plays a pivotal role in crafting insightful blog posts that not only highlight the unique features of our offerings but also provide valuable......