How to Install Under Cabinet Lighting Without Drilling

Time:2026-11-06 Author:Charlotte
0%

How to install under cabinet lighting without drilling begins with a simple question: what can your cabinets safely hold? Adhesive-mounted LED bars and flexible light strips can brighten a counter without holes, but the finish, surface condition, and product weight all matter. A glossy cabinet underside may accept a different adhesive than textured wood. Check the manufacturer’s mounting instructions before buying.

The energy case is strong, too. The U.S. Department of Energy’s Energy Saver guidance says LEDs use at least 75% less energy and last up to 25 times longer than incandescent lighting. Those figures describe LEDs broadly, not every under-cabinet product, so compare each fixture’s efficiency and rated lifespan. For a grounded design perspective, lighting designer Randall Whitehead has described lighting as “the jewelry of the home.” Under cabinets, that detail should illuminate the cutting board without shining directly into your eyes.

A good installation starts with a dry, clean surface and a temporary layout test. Hold the lights in place, check where cords will run, and make sure the beam reaches the work area. Small details matter. Adhesive is not magic: heat, grease, dust, and unsuitable finishes can weaken its grip. Follow the product’s cure-time instructions, and avoid placing lights where steam or splashes could reach them unless the fixture is rated for that environment. One weakness in many quick guides is their focus on sticking the light up, not planning access to the power source. This guide covers both, while noting that adhesive mounting may not suit every cabinet.
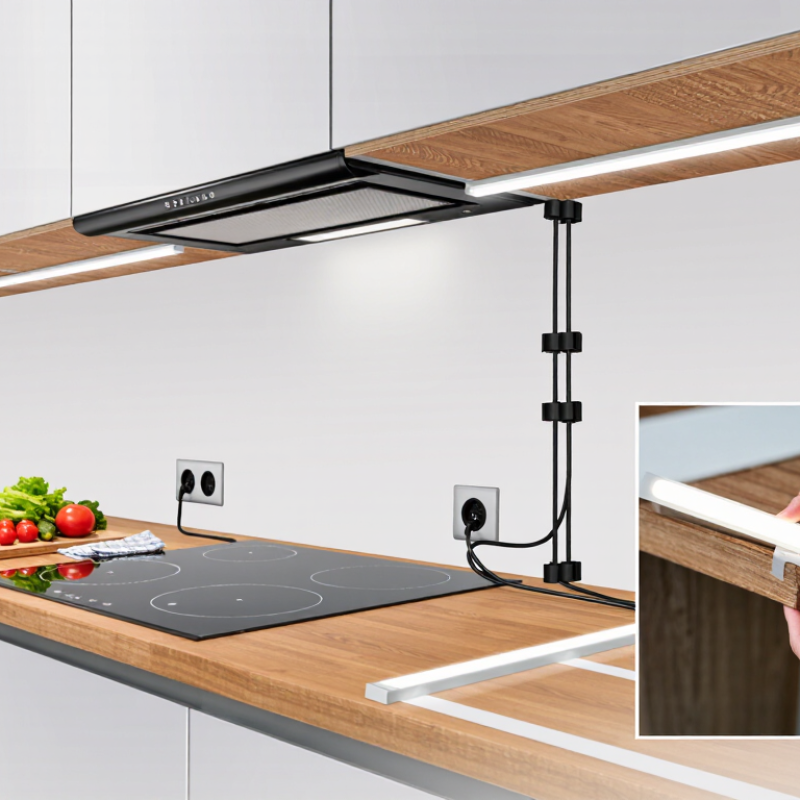
How to Install Under Cabinet Lighting Without Drilling

Choose a Suitable Under-Cabinet Lighting System

For a no-drill installation, choose a lighting system that suits both your cabinets and your routine. Adhesive LED bars are simple to position and often provide an even pool of light across a countertop. Flexible LED strips can fit longer runs, but they need a clean, smooth mounting surface. Check the cabinet finish first; textured wood, grease, or peeling paint can weaken adhesive. Test a small section in a discreet spot. It may not hold.

Decide how you want to power the lights. Battery-powered or rechargeable units avoid visible cords, though they need regular charging or battery changes. Plug-in lights can run longer without interruption, but measure the distance to an outlet and plan a tidy cable route. Adhesive cable clips can help keep wires tucked against the cabinet underside. For cooking areas, look for a system rated for the expected heat and occasional splashes, and follow its installation instructions.

Color and brightness matter as much as convenience. A warm-white setting can feel comfortable in the evening, while a neutral white often makes food preparation easier to see. Check the stated brightness and color-rendering information, rather than choosing by appearance alone. If possible, compare the light against your countertop before installing the full set. Small detail. A motion sensor is handy near a sink or pantry, but it may switch on when you do not expect it. A dimmer gives more control.

Choose a Suitable No-Drill Under-Cabinet Lighting System

Common nominal color temperatures for under-cabinet lighting. Choose a light color that suits your workspace, then select an adhesive-mounted strip, bar, or puck light based on the coverage and power source you need.

Prepare the Cabinet Surface and Gather Installation Materials

Start with the cabinet surface, not the adhesive. Wipe away cooking grease, dust, and cleaner residue with a lint-free cloth and mild detergent. Follow with a clean, damp cloth, then let the underside dry completely. Even a thin greasy film can weaken a peel-and-stick bond. Check the finish in a hidden corner before using alcohol; some coatings may dull or soften.

Measure each cabinet run twice, including corners and gaps near the backsplash. Gather the light bars or tape, compatible adhesive clips, a tape measure, scissors, and a pencil. For plug-in lights, check that the cord reaches an outlet without crossing a hot cooking area. Keep the power supply and connectors accessible. Small details matter.

The U.S. Department of Energy’s LED Lighting guidance reports that LEDs use at least 75% less energy and last up to 25 times longer than incandescent lighting. That makes LED fixtures a practical choice, but the statistic does not guarantee adhesive will hold on every cabinet finish. Test one short section first, press it firmly, and check it after a day. I would not rush this part; waiting feels fussy, but peeling fixtures are worse.

Plan Light Placement and Power-Cable Routing

Plan the light before peeling any adhesive backing. Stand at the counter and note where your hands, cutting board, and small appliances usually sit. A strip set near the cabinet’s front edge usually lights the work surface more evenly than one pushed against the wall. Check for shadows from the cabinet frame, too. A quick test with a temporary lamp can reveal awkward dark patches.

Measure each cabinet section separately, including gaps and corners. Mark the intended light position with removable tape, then test it at night. Brightness can feel different after dark. I once underestimated how visible a cable would be against a pale backsplash; a short trial run would have caught it. Leave a little slack at corners, but keep the cord clear of hinges, drawer paths, and hot appliances.

Trace the power cable toward an outlet before fixing the lights in place. Choose a route along the cabinet’s underside or rear edge, where clips or an adhesive cable channel can hold it neatly. Clean and dry the surface first, and check that the cable will not be pinched when doors close. Keep connectors away from sinks and splashes, and follow the light’s instructions for power and placement. Test every section before securing the final cable run.

Attach the Lights Using Adhesive or Magnetic Mounts

Adhesive mounts are a practical choice when you want to add under-cabinet lighting without drilling. Check that the cabinet underside is smooth, clean, and dry before attaching anything. Wipe away grease with a suitable cleaner, then let the surface dry fully. Dust or cooking residue can weaken the bond. Test a small area first, especially on painted or delicate finishes. Some adhesives can lift paint during removal. Small detail, big difference.

Position each light near the front edge, but leave room for its switch and charging port. Peel the backing, press the mount firmly, and follow the maker’s recommended setting time before hanging the light. Don’t rush it. Magnetic mounts offer easier removal, but they need a compatible metal surface or an adhesive-backed metal plate. Check the light’s weight and mount capacity, and keep cables clear of cabinet doors and heat-producing appliances. It’s tempting to place lights by eye; a quick dry fit often reveals uneven spacing before the adhesive is committed. Adhesive can also loosen over time, so check the mounts occasionally.

Connect the Power Supply and Test the Installation

Lay out the light bars and power cable beneath the cabinets before attaching anything. With the supply unplugged, match its output voltage and connector polarity to the fixture’s specifications. Add the lights’ wattages and confirm the total stays below the supply’s rated capacity; leave a little headroom. Do not guess. Keep cables clear of sink splashes, hot surfaces, and cabinet hinges. Connect the sections, then plug in the supply and switch on every light. Check for flickering, dim sections, loose connectors, or unusual heat. A quick test now can save you from peeling adhesive off twice.

If the lights work, unplug the supply again before securing the bars and cable clips. Once mounted, reconnect power and test the full run for several minutes, including the switch or dimmer. The U.S. Department of Energy reports that LED lighting uses at least 75% less energy and can last up to 25 times longer than incandescent lighting; efficient LEDs still need a correctly matched power supply. I would recheck the cable route after closing each cabinet door, since a tidy-looking wire can still catch on a hinge. If a connector feels loose or a section stays dark, disconnect power and inspect the connection rather than pressing it harder.

How to Install Under Cabinet Lighting Without Drilling — Connect the Power Supply and Test the Installation

Step What to Check Example Installation Data Pass Condition
1. Confirm the light’s requirements Read the lighting product label or instructions before connecting power. Example: 12 V DC light, rated at 4.8 W per metre The power supply’s output voltage matches the light’s specified voltage.
2. Calculate the total load Multiply the light’s power per metre by the installed length. 4.8 W/m × 3 m = 14.4 W total The power supply is rated for at least the calculated load; follow the light and supply instructions.
3. Check the power supply capacity Verify the supply’s output voltage, wattage, and current rating. Example: 12 V DC, 24 W maximum output (2 A) The supply has sufficient capacity for the connected lights and is suitable for their type.
4. Connect with power off Unplug the supply before joining low-voltage connectors. Match positive and negative markings where applicable. 12 V DC connection; polarity checked at each connector Connectors are fully seated, polarity is correct, and no bare conductors are exposed.
5. Secure the cable and supply Use suitable adhesive clips or cable channels to keep the wiring tidy without drilling. Cable routed away from heat, sharp edges, and moving cabinet parts The cable is not pinched or under tension, and the supply’s ventilation openings remain clear.
6. Power on and test Plug in the supply and operate the switch, dimmer, or controller. Example: all 3 m of lighting turns on evenly and responds to the control No flicker, unexpected dimming, unusual noise, or excessive heat is observed.
7. Inspect after a short run Let the lights run for about 10 minutes, then check the connections and power supply. Example observation: connectors remain secure; supply is warm but not unusually hot Stop using the installation if a connector loosens, a burning smell occurs, or any component becomes excessively hot.

Example values are for illustration only. Always follow the instructions and electrical ratings supplied with the specific lighting and power supply.

FAQS

Where should under-cabinet lights sit?

Place them near the cabinet’s front edge to light the counter evenly. Check for shadows from the cabinet frame.

How can I check the light position before installing it?

Mark the spot with removable tape and test it at night. A temporary lamp can reveal dark patches.

How should I measure cabinet sections?

Measure each section separately, including corners and gaps. Leave a little cable slack at corners.

Where should the power cable run?

Route it along the cabinet’s underside or rear edge. Use clips or a cable channel to hold it neatly.

How do I keep cables clear and safe?

Keep them away from hinges, drawers, heat, and splashes. Check that closing doors will not pinch the cable.

What should I check before attaching adhesive mounts?

Make sure the surface is smooth, clean, and dry. Grease and dust can weaken the bond.

Can adhesive damage cabinet finishes?

It can lift paint, especially on delicate surfaces. Test a small, hidden area first. I once overlooked this.

What should I know about magnetic mounts?

They need a compatible metal surface or an adhesive-backed metal plate. Check the mount’s capacity and the light’s weight.

When should I secure the final cable run?

Test every light section first, then secure the cable. Don’t rush it. Adhesive can loosen over time.

Conclusion

How to install under cabinet lighting without drilling begins with choosing a lighting system that suits your cabinets, workspace, and available power source. Before installation, clean and dry the cabinet surface so adhesive mounts can hold securely, and gather the lights, mounting materials, and any needed cable clips. Plan where each light will go, aiming for even coverage across the work area, and decide how to route the power cables neatly and safely.

Attach the lights with adhesive or magnetic mounts, following the product instructions and allowing adhesive to set if required. Connect the power supply, keeping cables tidy and clear of heat or moisture. Finally, switch on the lights and check that each one works, the illumination is balanced, and all mounts and connections remain secure.

Charlotte

Charlotte

Charlotte is a seasoned marketing professional with a deep understanding of the company's portfolio and a passion for elevating its presence in the market. With a keen eye for detail and a commitment to excellence, she ensures that our professional blog is regularly updated with insightful articles......